


A leaky shower faucet is one of those classic household plumbing problems. It’s tempting to ignore, but that steady drip can have bigger consequences than you’d think, adding up to wasted water and a surprisingly high utility bill. The best part is, with a little know-how, this is a problem most people can solve themselves without forking over money for a professional.
The impact of what seems like a minor leak is pretty staggering. Environmental studies have shown that a single faucet dripping just once per second can waste over 3,000 gallons of water in a year. To put that in perspective, that’s enough water for more than 180 showers. When you factor in the cost of a plumber, which can easily run from $100 to $300, tackling this yourself starts to look like a very smart move. You can read more about the shower faucets market here.
Common Causes Of Shower Leaks
Most of the time, a leaky shower isn’t a sign of a massive plumbing disaster. It’s usually just small, internal parts giving out after years of use. Figuring out which part is the culprit is your first step to a successful repair.
Before diving in, it can be helpful to match your faucet’s behavior to its likely cause. A continuous drip often points to a different problem than a leak that only happens when the water is on.
Here’s a quick diagnostic table to help you pinpoint the issue:
Common Leak Symptoms and Their Causes
| Symptom | Likely Cause | Common Solution |
|---|---|---|
| Steady drip from the showerhead when off | Faulty Faucet Cartridge | Replace the entire cartridge assembly. |
| Leaking around the base of the handle | Worn-Out O-Rings | Replace the small rubber O-rings. |
| Drips or leaks from the tub spout | Tub Spout Diverter Failure | Replace the diverter or the entire spout. |
| Leaking from the faucet body itself | Degraded Seals and Washers | Replace internal seals and washers. |
Understanding these symptoms will save you time and help you buy the right parts before you even turn off the water.
Let’s break down the most common troublemakers:
- Worn-Out O-Rings: These little rubber rings are meant to create a watertight seal around the faucet’s cartridge. Over the years, they get brittle, crack, or just get loose, which is all it takes for water to start seeping through.
- Faulty Faucet Cartridge: This is basically the brain of any modern single-handle faucet, controlling both the flow and temperature. Made of plastic with rubber seals, it simply wears down from the constant turning and water pressure, leading to those frustrating, persistent drips.
- Degraded Seals and Washers: If you have an older, two-handle faucet, you’re likely dealing with rubber or neoprene washers. These press against a valve seat to stop the water, but the constant friction and pressure eventually wear them out.
Pro Tip: Before you start unscrewing anything, pull out your phone and take pictures at each step of the disassembly. Having a visual roadmap makes putting it all back together a thousand times easier and helps you avoid forgetting a tiny-but-crucial part.
For anyone tired of patching up an old, unreliable fixture, upgrading might be the best long-term solution. Investing in a high-quality CRANACH shower system can put an end to these recurring headaches. They’re built with better materials specifically to avoid the common leaks that plague older, builder-grade designs.
Gathering Your Tools and Replacement Parts
Heading into any DIY repair without the right gear is a recipe for a headache. A simple five-minute fix can turn into a multi-hour ordeal just because a tool was missing. Before you even think about shutting off the water, get everything you need lined up and ready to go. It’s like cooking—you get your ingredients prepped first.
Most of these leaky faucet jobs call for a pretty standard set of tools. You’ll almost certainly need both Phillips and flathead screwdrivers, a good set of Allen wrenches for those little hidden set screws, and a pair of channel-lock pliers. Also keep a utility knife and a few old rags close by—they always come in handy.
A dedicated cartridge puller tool can be an absolute lifesaver, especially with a stubborn faucet handle that just won’t budge. It saves you from accidentally cracking the fixture. You can usually rent one from a local hardware store if you don’t want to buy one for a one-off job.
Essential Replacement Parts
The specific parts you’ll need really depend on your faucet and what’s causing the leak. That said, a few usual suspects are responsible for most leaky shower faucets.
- Faucet Cartridge: This is the heart of most single-handle faucets and a very common culprit. Always take the old one with you to the store to guarantee you get an exact match.
- O-Rings and Seals: These little rubber rings and gaskets are another frequent point of failure. It’s smart to just buy a variety pack so you have plenty of sizes on hand.
- Plumber’s Grease: Don’t skip this. A little dab on new O-rings helps create a much better seal and keeps them from drying out and cracking prematurely.
Honestly, just getting the handle off can sometimes be the trickiest part of the whole repair. If you find yourself stuck, we have a great guide on how to safely unscrew a faucet handle without scratching up your finish.
But if you find yourself constantly patching up the same old fixture, it might just be telling you it’s time for an upgrade. A new CRANACH shower system could be a more permanent fix, giving you a lasting solution with modern, leak-resistant engineering.
Figuring Out Your Faucet Type and Where It’s Leaking
Alright, before we can even think about how to fix that leaky shower faucet, you’ve got to play detective for a minute. The first big clue is the faucet handle itself. Most showers these days have a single handle, but what’s going on behind the wall can be totally different from one model to the next. Getting this part right is the key to buying the correct parts on your first trip to the hardware store.
You’re most likely dealing with one of three main types: a cartridge, ball, or ceramic disk faucet. Each one looks and feels a little different, which can help you figure out what you have without taking a single thing apart.
- Cartridge Faucets: These are everywhere. You’ll know one by its straightforward handle motion—up and down for water pressure, then left and right for temperature. The movement feels very direct and almost mechanical.
- Ball Faucets: Look for a rounded, dome-shaped cap right below the handle. The handle on these often has a looser feel to it, moving in a wider, more circular arc to mix the hot and cold water.
- Ceramic Disk Faucets: These usually show up in higher-end showers. The handle glides with an incredibly smooth, almost effortless motion. Inside, two slick ceramic disks move over each other, giving you precise control over the water flow.
Nailing Down the Leak’s Location
Once you have a good idea of your faucet type, the next job is to find exactly where the water is getting out. The location of the leak is a dead giveaway for which internal part has given up the ghost.
Is water dripping constantly from the showerhead or the tub spout, even when the handle is pushed firmly to the “off” position? This almost always points back to a problem with the main internal part—the cartridge, the ball assembly, or the ceramic disks. These are the components that are supposed to shut the water off completely.
Key Takeaway: If you see water seeping out from behind the handle’s decorative plate (the escutcheon), your problem is probably the O-rings. These little rubber rings create a watertight seal, and when they get old and brittle, water sneaks past them and out from around the handle.
Sometimes, years of hard water can cause problems. If you see a lot of chalky, white residue caked on your fixture, you might be dealing with mineral buildup that’s causing parts to wear out or get stuck. It’s a good idea to learn about removing calcium deposits from faucets before you start trying to pull things apart.
If you’re tired of chasing down these little leaks, you might consider upgrading the whole setup. A modern CRANACH shower system is built with top-notch components designed to resist wear and mineral buildup, giving you a much more reliable, leak-free shower for years to come.
Your Guide to Repairing Any Shower Faucet
Alright, you’ve figured out where the leak’s coming from and have your tools lined up. Let’s get to it. The key to learning how to fix a leaky shower faucet is really about taking your time and being methodical. Don’t rush it.
First things first: shut off the water. You can either use the main shutoff for the house or find the specific valves for the shower. Once you’re sure the water is off, open the faucet to let any water left in the pipes drain out. Simple.
Now, let’s get that handle and the decorative plate (it’s called an escutcheon) out of the way. Most handles have a tiny set screw, usually tucked under a little plastic or metal cap. You can pop that cap off with a flathead screwdriver, but be gentle—you don’t want to scratch the finish.
Pro Tip: I always wrap the jaws of my pliers with a bit of electrical tape. It’s a simple trick that prevents ugly scratches on the faucet’s finish.
The Heart of the Repair
With the handle gone, you’ll be looking right at the faucet’s guts. What you do next completely depends on the type of faucet you have: cartridge, ball, or ceramic-disk.
- For Cartridge Faucets: You should see a small retaining clip holding the cartridge in. Grab your needle-nose pliers and pull that clip straight out. Then, you can usually grip the cartridge stem with pliers and pull it straight toward you. If it feels really stuck, a dedicated cartridge puller tool is a lifesaver and well worth the small investment.
- For Ball Faucets: After the handle is off, you’ll need to unscrew the cap and collar. Inside, you’ll find the ball itself, along with a couple of springs and rubber seals. Just lift the ball out and use a small screwdriver to gently pry out the old springs and seals.
- For Ceramic-Disk Faucets: These are often the most straightforward. Once you remove the escutcheon, you’ll see the screws holding the disk cylinder. Just undo those screws, and the whole cylinder will lift right out.
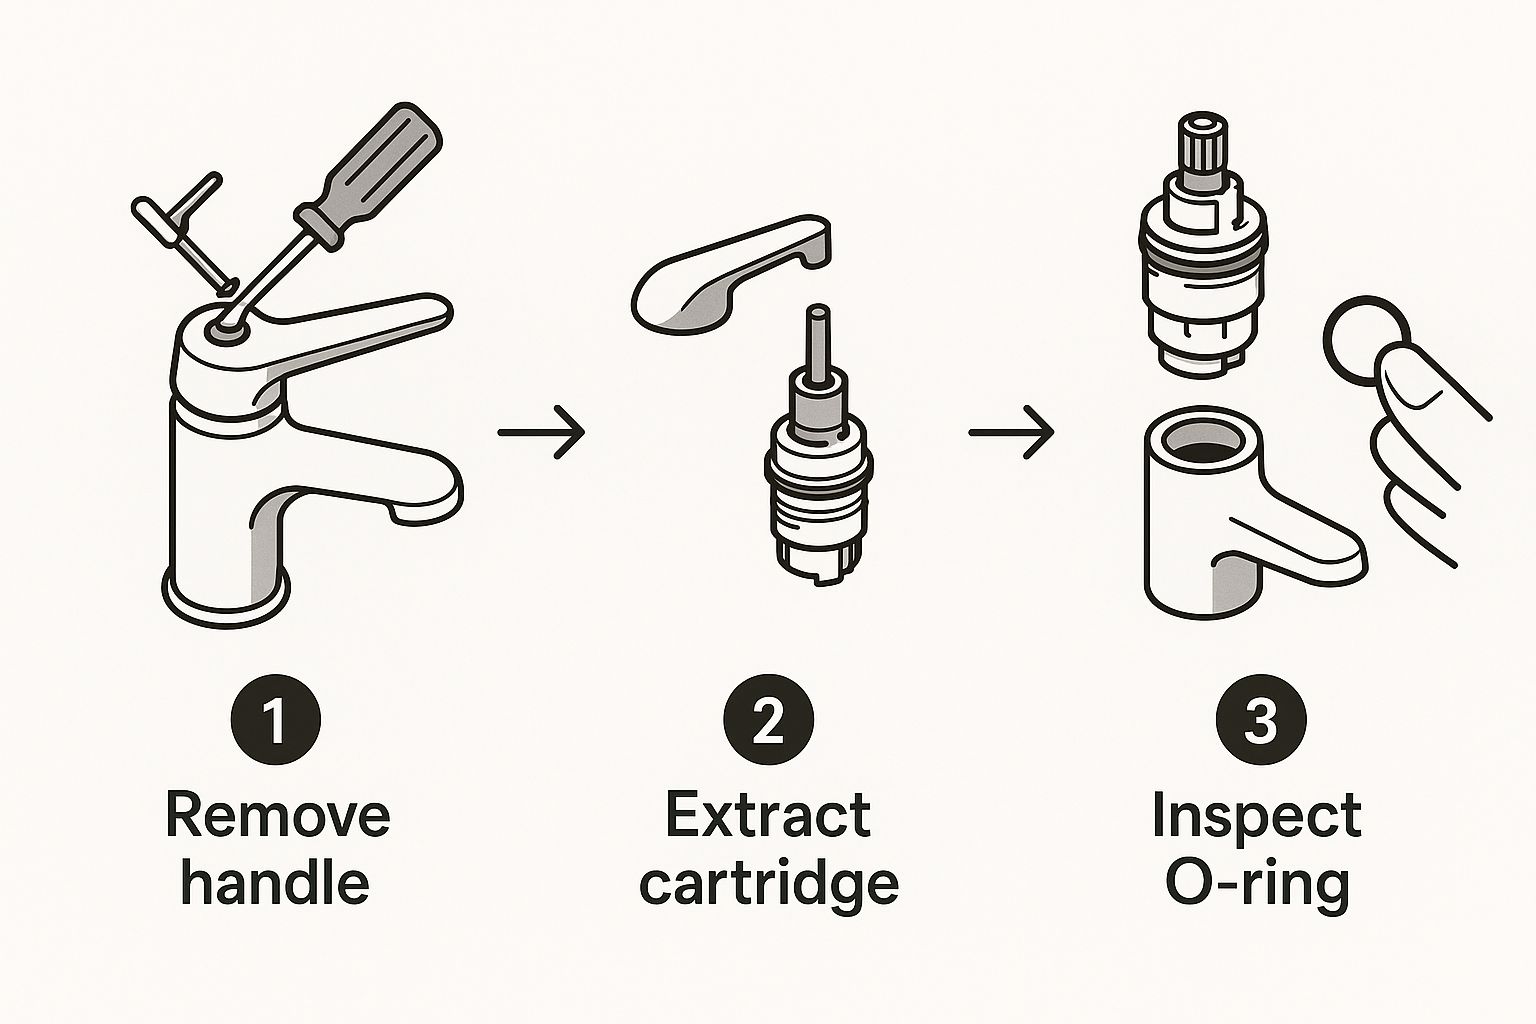
Seeing the internal parts broken down like this—handle off, cartridge out, O-ring exposed—really takes the mystery out of the process. It’s not as complicated as it seems, even if it’s your first time tackling a plumbing repair.
Upgrading for a Permanent Solution
If you want a more in-depth look at these steps, our complete guide on how to fix a leaky shower faucet has you covered. While a quick repair is great and saves money, if you find yourself fixing the same drip over and over, it might be a sign that the faucet’s best days are behind it.
Sometimes, an upgrade is the smartest move. Investing in a high-quality shower system isn’t just about looks; it’s about getting a long-term fix with better, more durable internal parts. It solves the drip for good and completely elevates your daily shower.
Keeping Future Leaks at Bay with Smart Maintenance
You fixed the leak—nice work. But the real win is making sure you don’t have to do it all over again in six months. A few smart habits can save you from the drip, drip, drip that drives everyone crazy. Think of it as preventative medicine for your shower.
Hard water is public enemy number one for your faucet’s guts. Over time, that chalky mineral buildup chews through seals and O-rings, causing them to give up way too soon. A quick inspection now and then can catch these troublemakers before they escalate.
Regular maintenance isn’t just about stopping drips. It’s about making your whole shower fixture last longer. A little attention now saves you from a much bigger, more expensive headache later.
Proactive Checks for a Drip-Free Shower
You don’t need a plumber on speed dial to spot the early warning signs. Making these simple checks part of your cleaning routine can make a world of difference.
- Hunt for Mineral Buildup: Keep an eye out for white, crusty deposits on your showerhead and around the faucet handle. Cleaning this stuff off regularly stops it from working its way inside and causing damage. For a full rundown, check out our guide on how to clean a shower head.
- Trust Your Touch: Pay attention to how the faucet handle feels when you turn it. Does it feel stiff? Gritty? A little too loose? That’s often the first clue that the internal cartridge is on its way out.
Another huge factor is starting with high-quality fixtures in the first place. When we do repairs, we always recommend fixtures made from durable materials like solid brass and stainless steel. They simply last longer and are less prone to leaks, a fact backed by the push for water efficiency in major markets. You can discover more insights about durable faucet materials here.
Ultimately, one of the best moves you can make is investing in a top-tier CRANACH shower system. They’re built from the ground up for durability and water efficiency, giving you a long-term fix for common faucet problems right from the start.
Got Questions About Fixing That Leaky Faucet?
It’s one thing to read a guide, but it’s another thing entirely to be halfway through a repair with water shut off and a handful of small parts. You’re bound to have a few questions pop up. Let’s tackle some of the most common ones I hear from people trying to fix a leaky shower faucet themselves. Getting these answers sorted can give you the confidence to see the job through.
How Much Money Can I Really Save Doing This Myself?
A lot, actually. Hiring a professional plumber to handle a dripping faucet will likely set you back anywhere from $100 to $300, depending on your location and the complexity of the job.
But if you tackle it yourself? The replacement parts you’ll need—like a new cartridge or a set of O-rings—usually cost less than $25 at your local hardware store. That’s a pretty significant saving for an hour or so of your time.
What If I’ve Replaced The Parts and It Still Leaks?
This is a frustrating one, but it happens. If you’ve put in a new cartridge and your faucet is still dripping, the culprit is often the valve seat. This is a small brass fitting deep inside the faucet body where the cartridge seals. Over the years, water can corrode it or create tiny nicks, preventing a perfect seal.
You’ll need a special tool called a seat wrench to replace it, but it’s a job you can definitely handle. For more context on these kinds of issues, it can be helpful to understand the wider plumbing and HVAC industry.
If you’ve replaced both the cartridge and the valve seat and the drip persists, you might be looking at damage inside the faucet body itself. At that point, it’s usually smarter and more cost-effective to replace the whole fixture instead of sinking more time and money into a lost cause.
Should I Bother Repairing or Just Replace the Whole Thing?
For a newer faucet with a simple drip, a quick repair is almost always the best way to go. It’s cheap, fast, and gets the job done.
However, if your fixture is ancient, you’re fixing it every year, or the finish is so corroded and ugly it pains you to look at it, a full replacement is the better long-term solution. A drip can also be a red flag for bigger water pressure problems. If you’re also fighting with weak flow, you might want to look into how to increase water pressure in your shower.
For a permanent fix that also upgrades your daily routine, consider moving to a modern CRANACH shower system. You’ll get better performance, save more water, and give your bathroom a fresh, updated look that lasts.