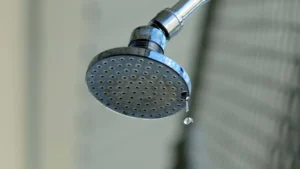


That constant drip, drip, drip from your shower isn’t just an annoying sound that keeps you up at night. It’s a classic plumbing problem, a surefire sign that something inside your faucet is worn out, wasting water and hiking up your utility bills.
But here’s the good news: fixing a leaky shower faucet is one of those DIY projects that most homeowners can absolutely tackle. It usually just comes down to a worn-out internal part, like a tiny O-ring or a faulty cartridge. The fix is pretty straightforward—shut off the water, take the handle apart, and swap out the bad component.
Figuring Out Why Your Shower Faucet Drips
A dripping faucet is more than just a minor headache. It’s a clear signal that an internal part of your shower’s valve has failed. If you let it go, you could be looking at much bigger issues down the road, like hidden water damage behind your walls or a water bill that makes your jaw drop.
And the water waste is no joke. A single faucet dripping away can waste over 3,000 gallons (that’s about 11,356 liters) of water in a year. The problem almost always comes down to a simple, inexpensive part like a washer or O-ring that’s seen better days.
Common Causes of a Leaky Faucet
Most leaks can be traced back to just a few key components that have worn out from the daily grind of turning the shower on and off. These parts are cheap and, with a little guidance, surprisingly easy to replace.
Here are the usual suspects:
- Worn O-Rings: These are small rubber rings that create a seal around the valve stem. Over the years, they get brittle, crack, or just loosen up, letting water sneak past.
- Faulty Cartridge: If you have a single-handle faucet, it uses an all-in-one cartridge to control both the water flow and temperature. When the seals inside this cartridge wear down, you get that relentless drip.
- Damaged Washers: In older, two-handle faucets, you’ll find rubber or neoprene washers. They press against a valve seat to stop the water. After years of friction and pressure, they just wear out and can’t create a tight seal anymore.
Getting to the root cause is half the battle. A steady drip from the faucet spout itself? That usually points to a worn-out cartridge. If you see water seeping out from around the handle’s base, a bad O-ring is the likely culprit.
Here’s a quick summary of the usual suspects behind a leaky shower faucet and the signs to watch for.
Common Leak Causes at a Glance
| Symptom | Likely Cause | Difficulty to Fix |
|---|---|---|
| Drip from the shower head | Worn-out cartridge or washer | Easy |
| Leak around the handle | Worn O-rings | Easy |
| Inconsistent water temperature | Failing cartridge | Moderate |
| Trouble turning handle | Mineral buildup or damaged cartridge | Moderate |
With a clear idea of what you’re up against, you can gather your tools and get started.
Is This a DIY-Friendly Repair?
For most people, the answer is a big “yes.” You really don’t need to call in a professional plumber for this one. With a few basic tools you probably already have and a bit of patience, you can have this repair wrapped up in less than an hour.
While you’re at it, making sure your shower head is clean can also make a big difference in performance. You can check out our guide on how to clean a shower head for some simple tips.
Sometimes, though, a persistent leak is just a sign that your fixture is old and on its last legs. In that case, upgrading to a complete CRANACH shower system can be a fantastic long-term solution.
This not only fixes the leak for good but totally transforms your shower experience. For more handy household repair tips, checking out guides on fixing common household appliance problems can build up your DIY confidence.
Gathering Your Tools and Identifying the Faucet
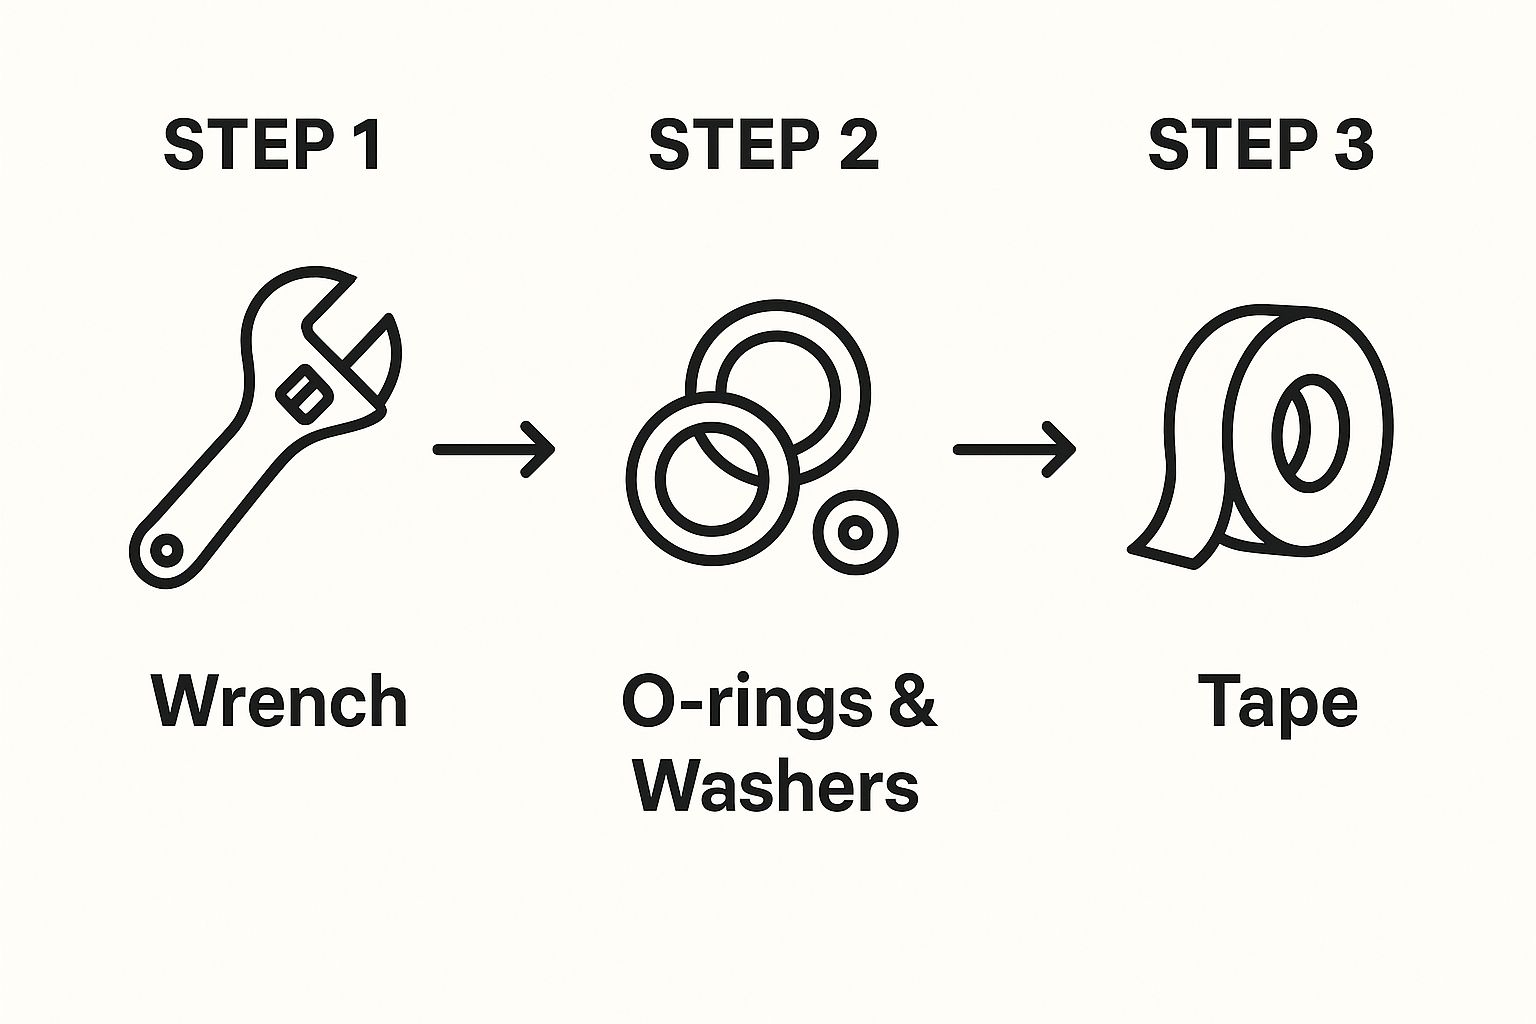
Before you even think about turning off the water, a little prep work can make all the difference. Honestly, taking a few minutes now can turn a potentially frustrating job into a smooth, successful one. The first real step in fixing a leaky shower faucet is to get your toolkit ready. Having everything you need within arm’s reach saves you from making a dozen trips back and forth to the garage.
Don’t worry, you don’t need a professional plumber’s entire truck for this. Most of what you’ll need is probably already sitting in your home toolbox.
Your Essential Repair Toolkit
Here’s a quick checklist of the basics you’ll want to have on hand to get this done right:
- Screwdrivers: You’ll definitely want a set with both Phillips and flat-head options. These are your go-to for removing faceplates and the main handle screw.
- Allen Wrenches: Lots of modern, single-handle faucets hide a tiny set screw under the handle. You’ll need the right size Allen wrench (also called a hex key) to get it loose.
- Adjustable Pliers or Wrench: These are perfect for gripping and turning the retaining nuts or clips that hold the faucet guts in place. A pro tip: wrap the jaws in a bit of electrical tape to keep from scratching up that beautiful chrome finish.
- Utility Knife: This comes in handy for carefully slicing away any old, stubborn caulk that might be sealing the escutcheon plate to the wall.
- An Old Towel: I can’t stress this enough—always, always place a towel over the shower drain. This one simple trick has saved me (and countless others) from the horror of watching a tiny, irreplaceable screw disappear forever.
Know Your Faucet Type
Once you’ve got your tools laid out, the next critical task is figuring out what kind of faucet you’re actually dealing with. Buying the right replacement parts depends entirely on this. Most showers in modern homes use one of three main types.
- Cartridge Faucet: This is the most common type you’ll see, especially in homes built in the last 30 years. It has a single handle that controls both water flow and temperature, and the magic happens inside a single, all-in-one cartridge that you can pull out and replace.
- Ball Faucet: This is another single-handle style, but you can usually spot it by the dome-shaped cap right at the base of the handle. It uses a slotted metal or plastic ball inside to mix the hot and cold water.
- Compression Faucet: This is your classic two-handle faucet, with one for hot and one for cold. Each handle operates a stem that has a rubber washer on the bottom, and it’s usually this washer that wears out and causes the drip.
Knowing which one you have before you head to the hardware store is key. Just snap a quick picture of the faucet with your phone. That way, you can show it to an employee or match it up with parts online. A little prep work here will ensure you walk out with the right parts on the first try.
A Practical Guide to Taking Your Faucet Apart
Alright, let’s get our hands dirty and tackle that leaky shower faucet. Taking apart a faucet can feel a little daunting the first time, but I promise it’s a straightforward process if you take your time. There’s one step you absolutely cannot skip, though. Before you even think about picking up a tool, shut off the main water supply to your house. Trust me on this one; forgetting this step turns a small repair into a major flood.
Once the water is off, you can start the disassembly. We’ll begin with the handle. Most are held on by a tiny set screw, often hiding under a decorative cap on the front or side. You can usually pop this cap off with a small flat-head screwdriver. Then, use an Allen wrench or a Phillips screwdriver to loosen the screw and pull the handle straight off.
Removing the Faceplate and Accessing the Valve
With the handle out of the way, you’re looking at the faceplate, which plumbers call an escutcheon. This is the decorative plate sitting flush against your shower wall. It’s typically secured with a couple of screws you can see right away. Go ahead and remove them. Be gentle here—sometimes, old caulk can make it stick. If it’s stubborn, carefully run a utility knife along the edge to break the seal before you pry it off.
Here’s a piece of hard-won advice from my years of doing this: always, always put an old towel or rag over the shower drain before you start messing with screws and small parts. It’s a simple move that will save you the headache of watching a crucial piece disappear down the drain for good.
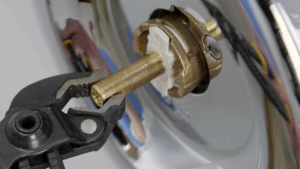
Behind that plate, you’ll find the heart of the matter: the valve body. You’ll likely see a retaining clip or a couple of larger screws holding the main cartridge or valve stem in place. These have to come out before you can pull the leaky part. If mineral buildup has things seized up, a little penetrating oil can be a lifesaver.
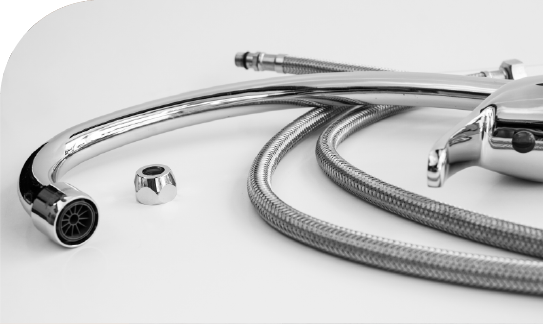
This diagram lays out the common tools and replacement parts you’ll be working with.
As you can see, the repair really just comes down to using basic tools to get to those simple internal seals—things like O-rings and washers. The main goal is to expose the faucet’s core without causing any damage. If you work patiently through these steps, you’ll have those worn-out parts removed and be ready for the new ones in no time.
Replacing the Cartridge and Other Worn Components
You’ve successfully taken the faucet apart and can see the valve body. This is it—the heart of the operation. You’re looking right at the culprit behind that annoying drip, and now it’s time to replace the main cartridge and any other parts that look like they’ve seen better days.
For most modern single-handle faucets, the cartridge is the all-in-one component responsible for leaks. Getting it out should be a simple affair. After you pop out the retaining clip or undo the screws, a good pair of pliers is usually all you need to pull it straight out. But here’s where you might hit a snag. If that cartridge has been sitting in there for years, caked-on mineral deposits can weld it in place.
When it feels completely stuck, don’t force it. This is where a specialized tool called a cartridge puller becomes your best friend. It’s designed specifically to grip the cartridge without crushing it, giving you the leverage to wiggle it free without damaging the faucet itself.
Don’t Forget the Small Stuff
With the main cartridge out, it’s easy to get tunnel vision and focus only on the big replacement. But hold on. This is the perfect moment to play detective and inspect the smaller, often-overlooked seals that are just as critical.
- O-Rings: Take a close look at the small rubber O-rings seated on the valve body. If they look cracked, feel brittle, or are noticeably flattened, swap them out. These tiny parts are a massive failure point, and they cost pennies to replace.
- Washers and Seals: Your faucet model might have other rubber washers or seals inside. Give them a quick once-over for any signs of wear and tear and replace them as needed.
Here’s a pro tip: Before you put anything new in, grab an old toothbrush or a rag and clean out the inside of the valve body. Getting rid of any grit or mineral scale ensures the new cartridge will seat perfectly, giving you that flawless, watertight seal you’re after.
A Chance for a Real Upgrade
Instead of just doing a like-for-like swap, think of this repair as an opportunity for a serious upgrade. A high-quality replacement cartridge can make a world of difference for future reliability. This is especially true when you consider the scale of the faucet market; the global industry was valued at around $25.32 billion in 2025 and is projected to climb past $51.17 billion by 2034. A lot of that growth is thanks to innovations like durable ceramic disk cartridges, which have drastically cut down on leaks compared to old-school designs. You can discover more insights about the faucet market on Precedence Research.
This focus on long-term reliability is why investing in a complete CRANACH shower system can be such a smart move.
A complete, integrated system is designed for every component to work in harmony, centered around a high-quality, durable cartridge built for the long haul. Upgrading the whole system offers a permanent solution, not just a quick fix, ensuring you won’t have to do this again anytime soon. The skills are transferable, too. If you’re feeling confident after this project, you might be interested in our guide on how to replace a bathroom faucet.
Now, with your new parts in hand, gently press the new cartridge into the valve body. Make sure it’s aligned properly—it should slide in smoothly. Re-insert the retaining clip or screws to lock it down, and you’re officially on the home stretch, ready for reassembly.
Putting It All Back Together and Checking Your Work
With the new parts in place, you’re in the home stretch. Now it’s time to reassemble everything and see the fruits of your labor. You’re basically just going to reverse the steps you took to get everything apart, but this is where attention to detail really matters for a leak-free finish. The idea is to get every connection snug, but not cranked down so hard that you crack the very components you just installed.
First, you’ll carefully guide the new valve stem or cartridge back into its housing. Pay close attention here—make sure any notches or guides on the cartridge line up perfectly with the valve body. Once it’s seated properly, secure it with that retaining clip or the screws you carefully set aside earlier. This is where having a clean, gunk-free valve body really pays off, ensuring a perfect, snug fit.
Securing the Faceplate and Handle
With the internal valve secure, you can slide the faceplate (also known as the escutcheon) back against the wall. Fasten it down with its screws. Here’s a pro-tip from experience: run a thin, fresh bead of bathroom caulk around the top and side edges of the plate after it’s screwed in. This adds an extra waterproof barrier, preventing any stray moisture from sneaking behind your wall.
Next up is the handle. Slide it back onto the valve stem and tighten the set screw that locks it in place. Don’t forget to pop that little decorative cap back on to hide the screw. Give the handle a light wiggle just to be sure it feels solid and secure.
The Moment of Truth
Now for the best part—seeing your repair in action. Head back to your main water supply and slowly turn it back on. Don’t just throw the valve wide open. Easing it on gradually prevents a sudden jolt of pressure, often called a water hammer, which can be rough on your plumbing.
Once the water is back on, it’s time to test your work. Turn the shower handle to run the water for a minute or so, then turn it off completely. Now, watch. Keep your eyes on the shower head for any lingering drips. You’ll also want to check around the base of the handle and the faceplate for any signs of seepage. If it’s all bone-dry, you’ve done it!
A dry faucet means you’ve successfully fixed a leaky shower and saved yourself the cost of a plumber. Enjoy that drip-free peace and quiet! If you feel like your shower’s performance has changed after the fix, you might find our guide on how to increase water pressure in your shower helpful.
If you find yourself tackling this same leak again in a year or two, it might be a sign of a bigger issue. Sometimes, a persistent leak is the faucet’s way of telling you it’s time for an upgrade. Moving to a complete, high-quality CRANACH shower system can be a more permanent fix, giving you reliability and a touch of luxury for years to come.
When to Repair and When to Upgrade Your Shower System
Fixing that one leaky shower faucet feels like a great DIY win, but preventing future headaches is even better. After you’ve successfully stopped the drip, you have to ask yourself a crucial question: Was this a one-off fix, or a warning sign of bigger problems lurking down the line?
The choice to stick with simple repairs or invest in a full upgrade really comes down to knowing when your current faucet is just past its prime.
Sometimes, the answer is staring you right in the face. If you find yourself fixing the same leak every year, that’s your signal. Other tell-tale signs are visible corrosion or rust spots on the fixture, a handle that feels wobbly or tough to turn even after a repair, or discovering that replacement parts for your older model have become a full-on treasure hunt.
Evaluating the Long-Term Solution
When repairs become a regular event on your calendar, you’re no longer just spending an hour of your Saturday on a project. You’re putting a temporary band-aid on a fixture that’s slowly failing. Each repair costs money for parts and, more importantly, your valuable time. This is the exact point where an upgrade shifts from being a luxury to a smart, practical investment in your home.
The move to upgrade is backed by some major trends. Across North America, spending on bathroom renovations remains consistently strong, pushing demand for both repairs and more modern, efficient fixtures. This is driven partly by initiatives like the Environmental Protection Agency’s WaterSense program, which since 2006 has championed water-efficient products that cut down on leaks and waste.
A key takeaway here is to see an upgrade not as a cost, but as an investment in reliability and efficiency. Over time, the savings on your water bill and the eliminated cost of future repair parts can make a new system surprisingly economical.
The Benefits of a Modern Shower System
Moving to a modern shower system gives you more than just a fresh look. It’s about gaining peace of mind and seriously enhanced performance.
- Superior Durability: Modern fixtures are often built with advanced materials like ceramic disc cartridges. These are far more resistant to wear and tear than the old-school rubber washers you might be wrestling with.
- Enhanced Water Efficiency: Newer systems are engineered to deliver a fantastic shower experience while using significantly less water. That translates directly to lower utility bills each month.
- Improved Performance: An upgrade can solve other nagging issues beyond leaks. If you’re also dealing with weak flow, you might want to read our article about how to increase the pressure of water in your shower.
If your shower faucet issue turns out to be more complex than a simple DIY fix, or if you’re leaning towards a full upgrade, sometimes it’s best to call in the experts. Consulting with professional faucet and fixture repair services can help diagnose any underlying plumbing issues and ensure your new system is installed flawlessly.
Ultimately, an upgrade is about securing long-term reliability for one of the most-used fixtures in your entire home.
For a solution that combines modern aesthetics with lasting durability, consider a CRANACH shower system. It’s an investment in a leak-free, high-performance shower experience for years to come.